One Feature Launch, Three Stories: Plan‑Tier Email Routing for SEO SaaS
Shows how an SEO SaaS can use a single plan_tier attribute in Spreeflo to route one feature launch into distinct Free, Pro, and Enterprise email paths, driving upgrades, adoption, and enterprise rollouts without maintaining three separate campaigns.
Industry
Niche
Pattern
Loading sequence...
You ship a big feature. You open your email tool. And you either burn an afternoon cloning the same campaign three times, or you blast one generic announcement to every customer and hope it lands.
For a rank tracker or technical SEO platform, that gap is expensive: Free users need a reason to upgrade, Pro users need a reason to log back in, Enterprise teams need a reason to roll the feature out across clients.
The sequence at the top of this page is the whole journey, end to end. It shows how a single feature announcement can automatically fork into Free, Pro, and Enterprise paths without three separate campaigns.
We’ll walk through that sequence node by node, using a fictional SEO SaaS called RankRiver: a 4‑person team offering rank tracking and technical audits, sitting at ~$40k MRR. Their stack: Stripe, a custom Node backend, and Spreeflo for email and automation.
RankRiver’s problem was simple: the same product update meant totally different things by plan tier, but their email tool treated everybody the same.
This pattern fixes that.
Why plan-tier routing is low-hanging fruit for SEO SaaS
Plan tier is the most obvious way your customers differ, and yet it’s also the one most teams underuse in automation.
For an SEO SaaS, those tiers usually map to radically different jobs:
Free: solo marketers trialing you alongside three other tools. Goal: prove value fast and move them to paid.
Pro: in‑house marketers or small agencies. Goal: deepen feature adoption and retention.
Enterprise/Agency: multi‑seat teams and big retainers. Goal: expansion and “we can’t live without this” status.
When you send the same “New Technical Audit Engine is Live!” email to all three:
Free users see features they can’t access yet and quietly churn.
Pro users don’t realise it’s already in their plan and never try it.
Enterprise teams don’t see how it fits their workflows or client reporting.
Spreeflo’s whole point is to let you capture detail on every customer so you can speak to each of them uniquely. In this pattern, that “detail” is a single contact attribute: plan tier.
You’ll use that one attribute to drive a Multi-way Split so every contact gets a different mini-journey from the same campaign.
Campaign or journey: which version are we building?
You can use plan-tier routing in both:
As a Campaign for one-off product updates or launch announcements.
As a Journey for evergreen flows like onboarding, expansion nudges, or renewal sequences.
The sequence at the top of this page is set up as a campaign, because that’s the most common use case for “same feature, different stories by plan.” The pattern itself is identical in a journey: only the entry point changes.
If you want a refresher on the difference, the campaigns and journeys overview covers when to use which.
Let’s build the campaign version step by step.
Step 1: Make “plan” a first-class contact attribute
Before you touch the sequence, your account needs a reliable way to know who is Free, who is Pro, and who is Enterprise.
In Spreeflo, that’s a contact attribute:
Create a custom attribute named something like
plan_tier.Use a TEXT or SELECT type with values like
free,pro,enterprise.
Then keep it up to date:
When someone signs up or upgrades in your app, your frontend calls
Spreeflo.identify('email@domain.com', { plan_tier: 'pro' })so the SDK updates their record in the browser.Your backend billing logic can also POST to the Spreeflo API when Stripe webhooks fire (e.g.
customer.subscription.updated), settingplan_tierserver-side.
Once plan_tier is reliably set, it becomes usable everywhere: segments, If/Else logic, and the Multi-way Split we’re about to add.
Step 2: Create a product-update campaign with the right audience
In RankRiver’s case, they’re announcing a new “Automated Technical Audit” engine.
Inside Spreeflo:
Create a new Campaign.
Choose an audience that includes everyone who should hear about the feature. Typically:
You can build that audience as a reusable segment in the segment builder, or define it inline.
Email Subscription Status is “Subscribed”.
Tag contains
customer(to exclude pure newsletter leads).
This defines who enters the campaign. From here on, the sequence decides what they see.
Step 3: Add a Multi-way Split on plan tier
From the campaign start, your very first node is a Multi-way Split.
Configuration:
Create three named branches:
For each branch, use the Segment Builder:
Set the
elsebranch name to something like “Unknown/Trial”.
Branch A: “Free”
Branch B: “Pro”
Branch C: “Enterprise”
Free branch condition
Filter category: Contact Attributes
Field:
plan_tierOperator:
isValue:
free
Pro branch condition
Same, but value:
pro
Enterprise branch condition
Same, but value:
enterprise
Because each condition is mutually exclusive, order doesn’t matter here. Every contact will drop into exactly one branch.
This node is the heart of the pattern: instead of one generic path, you’ve now created three plan-specific paths (plus a catch-all) that you can treat as mini-campaigns sharing a common start.
Step 4: Design the Free plan branch – upgrade story
Free users can’t use the full Automated Audit engine yet. Their story is about what they’re missing and why upgrading is worth it.
Branch: Free → first node: Send Email
Use Spreeflo’s email builder to create an email like:
Subject: “See what your competitors already fixed overnight”
Body: show before/after issues the audit would catch, but make it clear it’s a Pro feature.
CTA: “Start a 14‑day Pro trial” or “Compare plans”.
Configuration:
Node: Send Email
Use your normal sending identity.
Keep “Send only once” on (default) so nobody gets dupes if they re-enter later in a journey version.
Next node: Wait Condition
You want to give them time to upgrade, but move fast if they do. A plain Time Delay can’t react to mid-wait changes; Wait Condition can.
Configuration:
Condition (via Segment Builder):
Contact attribute
plan_tierisproORplan_tierisenterprise.Timeout:
7 days, unit: Day(s).
Effect:
If they upgrade within 7 days, the campaign moves them forward as soon as
plan_tierchanges.If they don’t, they move forward after 7 days anyway.
Next node: If/Else
This checks where they ended up after the wait.
Condition:
Same as above:
plan_tierisproORenterprise.“Yes” branch: Upgraded.
“Else” branch: Still Free.
Upgraded path:
Node: Send Email – “You just unlocked Automated Audits”
Optional Node: Add Tag
Focus on helping them use what they just bought, not patting yourself on the back for the sale.
Walk through “Run your first audit in 3 minutes” with a simple checklist.
Tag:
upgraded_from_free_auto_audit_campaignUseful for later cohort analysis.
Because the Wait Condition guarantees at least some delay from the first email, you don’t need another Time Delay before this second email. There’s never a point where two Send Email nodes are back to back.
Not-upgraded path:
Node: Send Email – “What Automated Audits would have found for you”
Node: Add Tag
Keep it low-pressure but concrete:
“Here are the exact issues customers like you fixed in week one.”
CTA: a softer upgrade prompt or an educational webinar.
Tag:
did_not_upgrade_auto_audit_campaign.
Then both branches end.
You’ve just turned “blast Free users about a Pro feature” into a tight, reactive mini-journey driven by plan tier.
Step 5: Design the Pro branch – adoption story
Pro customers already pay you. The job here is adoption and stickiness, not upgrade.
Branch: Pro → first node: Send Email
Angle: “Automated Technical Audits are now in your Pro plan.”
Make it explicit: “This is live in your account today. No extra charge.”
Next node: Wait Condition
Instead of watching the plan, you watch for usage. RankRiver tracks a custom event auto_audit_run whenever someone runs the new engine, sent from their app via Spreeflo.track('auto_audit_run', {...}) in the frontend or the events API on the backend.
Configuration:
Condition:
Custom Events →
auto_audit_runOperator:
triggered at least1 timeTime window:
in the last7 days.Timeout:
7 days, unit: Day(s).
Next node: If/Else – Used vs. not used
Yes branch (event triggered):
Send Email – “Power‑user tips for Automated Audits”
Add Tag –
auto_audit_adopted_pro.
Highlight 2–3 lesser‑known settings, report exports, or alerting combos that only make sense once they’ve run at least one audit.
Else branch (event not triggered):
Send Email – “Set up your first Automated Audit in 5 minutes”
Optional: Add Tag –
auto_audit_not_adopted_pro.
Short video or GIF walkthrough, link straight into the feature.
Maybe a “Done for you” template for common use cases.
Again, every Send Email is separated by a Wait Condition or If/Else, so pacing stays healthy.
Step 6: Design the Enterprise branch – rollout story
Enterprise or large-agency accounts care about workflows, teams, and outcomes across many projects.
Branch: Enterprise → first node: Send Email
Story: “Standardise technical audits across every client in one place.”
Anchor on predictable deliverables and saved analyst hours, not just shiny features.
Next node: Wait Condition
You might track adoption at the account level in a few ways:
Custom event
auto_audit_runwith a propertyaccount_scope: 'enterprise'.Or a tag
auto_audit_rollout_doneadded by a CSM via Spreeflo when rollout is complete.
Configuration example (event-based):
Condition:
Custom Events →
auto_audit_runOperator:
triggered at least10 times (you decide the threshold for “rolled out”)Time window:
in the last14 days.Timeout:
21 days, unit: Day(s).
Next node: If/Else – Rolled out vs. stalled
Rolled‑out branch:
Send Email – “Case study: how teams like yours cut audit time in half”
Send Internal Email
Share aggregate patterns or anonymised examples.
CTA: “Book a strategy review” or “Enable audits for more workspaces.”
Alert your success team: “Enterprise account has rolled out Automated Audits. Time to talk expansion?”
Include key contact context with personalization variables.
Stalled branch:
Send Email – “Need help rolling Automated Audits out to your team?”
Send Internal Email
Offer a migration or training session.
To CSM/Founder: “Enterprise account hasn’t adopted Automated Audits after 3 weeks.”
So a human can follow up.
Internal emails don’t go to the customer, so you don’t need extra spacing between those and customer-facing messages on the same path.
Step 7: Handle the “Unknown/Trial” branch – fix your data
The else branch from your Multi-way Split catches anyone whose plan_tier attribute is missing or unexpected.
This path is short but important.
Nodes:
Send Internal Email
Add Tag
Subject: “Contact with missing plan_tier in feature campaign.”
Body: include the contact’s email and current Stripe/customer ID if you store it.
Goal: flag data issues before they spread.
Tag:
missing_plan_tier.Helpful for later clean‑up via a segment.
These contacts don’t receive marketing email in this campaign until you trust the data. Better to skip them than send a misaligned message.
Step 8: Close the loop with tags and segments
At the tail of each path, you’ve already started tagging outcomes (upgraded_from_free_auto_audit_campaign, auto_audit_adopted_pro, etc.).
Those tags have three jobs:
Reporting inside this campaign.
Building new segments later.
Excluding people from future, redundant nudges.
For example, you can later build segments like:
“Free users who upgraded within 14 days of the campaign and have tag
upgraded_from_free_auto_audit_campaign.”“Pro users who received the ‘Set up your first Automated Audit’ email but still have no
auto_audit_runevent in 30 days.”
Using the segment builder with Tag, Custom Events, and Time Window filters, you can track plan‑specific feature adoption and tie real numbers to this pattern:
Free → Pro upgrade rate from this feature announcement.
Pro/Enterprise → feature activation and retention impact.
Because everything happens on one canvas, you get per‑tier performance without juggling three different tools or campaigns.
Adapting the pattern into evergreen journeys
The campaign we just walked through is “one feature, one shot.” But the exact same structure works as a Journey:
Trigger: Custom Event –
started_trialorplan_changed.First node: Multi-way Split on
plan_tier.Downstream: plan‑specific onboarding or upgrade sequences.
The mechanics stay the same, only now every new contact who meets the trigger condition automatically flows down the right path as long as the journey is active. The campaigns and journeys help doc shows how to translate a one‑time flow into a continuous one.
For a lean SEO SaaS team, that’s the difference between “we should really remember to segment next time we launch something” and a system that quietly does it for every launch, every time.
The bigger win: one attribute, three conversations
You didn’t add any shiny AI or heavy personalization logic here. You took one simple piece of data – plan tier – and let it steer your messaging.
That’s the core idea behind Spreeflo’s approach: capture detail on every customer so you can speak to each of them uniquely. Plan tier is often the easiest starting point, because you already have it in Stripe or your user table. Once it lives on the contact, Multi-way Split and the rest of the sequence editor do the hard work.
The result:
Free users see aspirational, upgrade‑driven stories.
Pro users see “this is live in your account, here’s how to win with it.”
Enterprise users see rollout narratives tied to their team and clients.
Your team maintains one reusable pattern instead of three separate campaigns.
If you’re already tracking who is Free, Pro, and Enterprise, you have everything you need to build this sequence. Open your next feature launch in Spreeflo, drop a Multi-way Split right after the start, and let a single campaign talk to three very different customers like you actually know who they are.
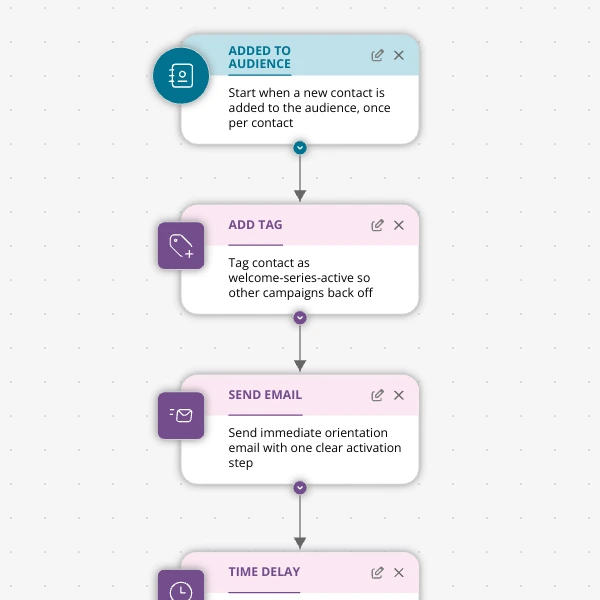
The Shopify app welcome series that turns installs into income
A step-by-step Shopify app welcome email journey for tools like CartSpark, showing how to turn new installs into activated, retained merchants using Spreeflo journeys, tags, and behavioral triggers so fewer trials quietly churn and more trials convert.
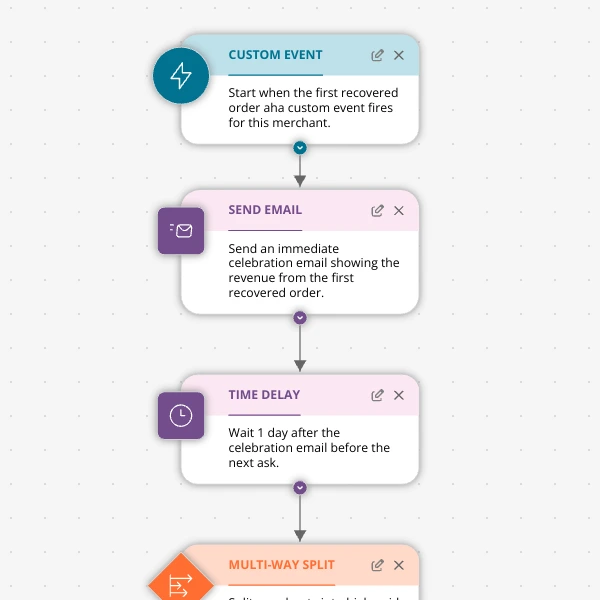
The Aha-Moment Playbook For Shopify Apps: Turn One Magic Action Into Months Of Revenue
A node-by-node playbook for Shopify and e‑commerce apps to center their lifecycle on one aha-moment custom event in Spreeflo, celebrate it, segment merchants by profile and engagement, and turn first recovered value into lasting revenue and retention.
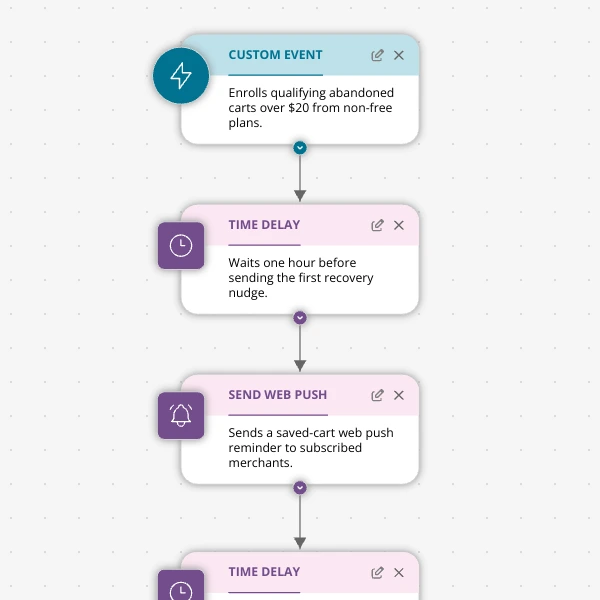
Stop Letting High‑Intent Carts Die: A 3‑Email Recovery Journey for Shopify Apps
A detailed, node-by-node walkthrough of a three-email (plus optional web push) cart-abandonment recovery journey for Shopify apps in Spreeflo, showing how to trigger events, branch on behavior, tag outcomes, and measure recovered carts and revenue.
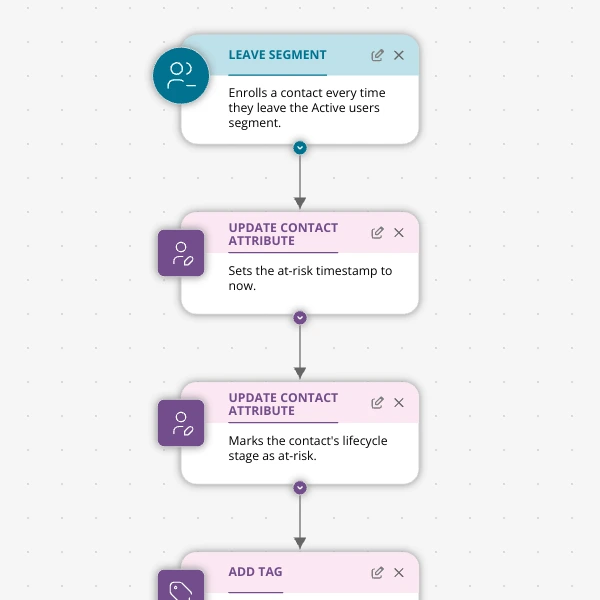
When Active Users Go Dark: A 4‑Touch Win‑Back Journey For Your Shopify App
A detailed, node-by-node Spreeflo journey for winning back previously active Shopify app users who stop engaging, using segment-based triggers, conditional logic, and a four-touch email plus internal alert sequence to recover usage and MRR.