Help
Campaign and Journey Automation
Helper guide to using Spreeflo marketing automation platform.
Learn everything from setup to advanced features.
Overview
Spreeflo has 2 types of marketing automations:
- Campaigns: A campaign captures a fixed snapshot of contacts when it starts. It markets to only those contacts through to completion. Ideal when you want to market to everyone who currently matches specific conditions.
- Journeys: A journey runs continuously. Any new contact that meets its trigger conditions will automatically enter for marketing automation. Ideal for responding to new behaviors or profile updates over time.
Once you create a campaign or journey, you will be shown the Sequence Builder where you can add sequence components to design your automation. This guide will explore the sequence builder and Spreeflo's library of sequence components.
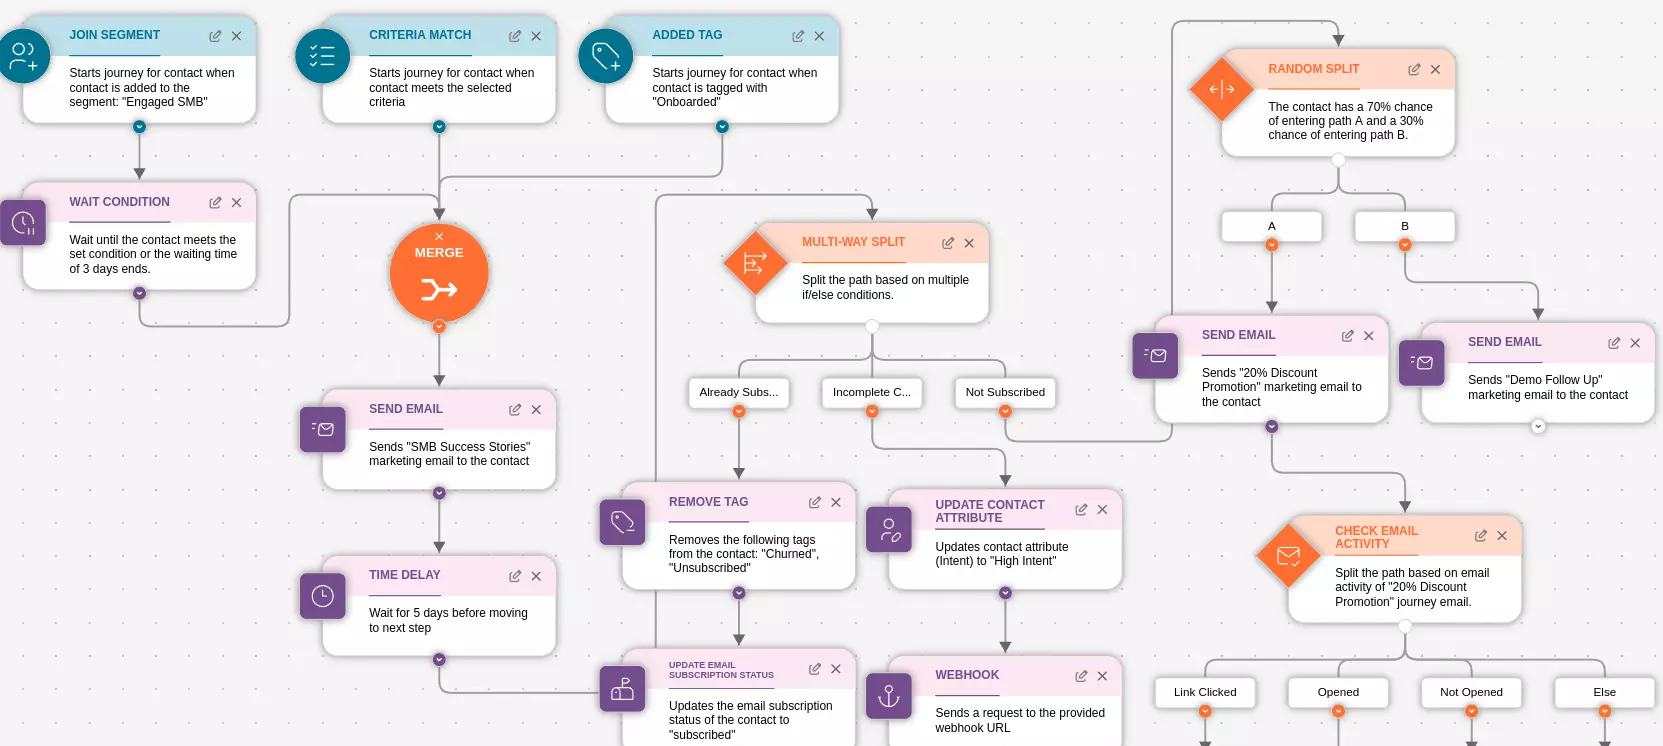
Sequence Builder
The sequence builder is a visual editor that allows you to drag and drop components to create your automation. You connect the components together to create the flow of actions. The sequences can branch out to multiple paths based on the conditions you set so that your automation can be highly personalized and responsive to your contacts.
The main difference between campaigns and journeys in regards to the sequence builder is that:
Campaigns do not have triggers. Otherwise, campaigns have available to the same library of sequence components as journeys.
Sequence Components
The sequence builder has a library of sequence components that you can drag and drop into the sequence editor. Each component has a specific function and can be configured to fit your needs.
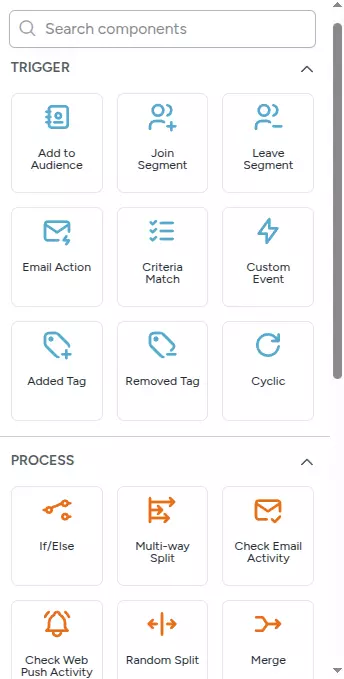
Here we will explore each sequence component type and how to use them.
Triggers
Triggers are the starting point of a sequence. They are used to start an automation for a contact once the contact meets the trigger conditions. Only journeys can have triggers.
Triggers have a Re-enrollment toggle. By default re-enrollment is off. Turn this on if you'd like contacts to go through this journey every time they meet the starting trigger conditions. Otherwise, contacts will only go through the journey if contact has not entered this journey before.
The Re-enrollment toggle is set per trigger, not per journey. Since a journey can have multiple triggers, you can mix triggers that have re-enrollment on with triggers that have it off in the same journey. Note that the "off" check is journey-scoped: if a contact has already gone through the journey via any other trigger, a trigger with re-enrollment off will not re-enroll that contact.
Regardless of the Re-enrollment setting, a contact who is currently moving through the journey will not be re-enrolled, even if the trigger conditions are met again. This is intentional — it prevents the contact from being processed by two parallel runs of the same journey and receiving duplicate or interleaved messaging in unpredictable order. The contact must finish or exit the journey before any trigger can enroll them again.
If your use case requires a message to be sent every time a condition is met — regardless of whether the contact is currently in a journey — that is a transactional use case and is better served by Spreeflo's transactional email API rather than a journey.

Add to Audience Trigger
Starts a journey for a contact when contact is added to an audience. Use this trigger to take actions on contacts without segmentation, e.g. send welcome emails, onboarding, etc.
Join Segment Trigger
Starts a journey for a contact when a contact joins a specified segment. Use this trigger for segment-based marketing campaigns.
Leave Segment Trigger
Starts a journey for a contact when a contact leaves a specified segment. Use this trigger for segment-based marketing campaigns.
Email Action Trigger
Starts journey for contact when contact performs the selected email action on your emails. The email actions that can be observed are Delivered, Opened, Link Clicked, and Replied. Do note that if you disabled tracking of email opens or email clicks, or did not set up the MX record for receiving email replies, then these actions will not be observed and this trigger will not be triggered.
Criteria Match Trigger
Starts a journey for a contact when a contact newly meets the selected criteria. This trigger behaves similarly to the Join Segment Trigger but with the ability to specify a custom criteria within the journey itself and without saving actual segments.
Added Tag Trigger
Starts journey for contact when contact is added with the selected tag.
Removed Tag Trigger
Starts journey for contact when contact is removed of the selected tag.
Cyclic Trigger
Starts journey for contact at regular intervals, such as daily, weekly, monthly or yearly, for contacts that meet the selected criteria. Use this to trigger periodic marketing campaigns, e.g. discounts for churned customers at end of every week for win-back.
You configure the repeat interval (every N days, weeks, months, or years), the time of day, and the timezone the schedule runs in. At each scheduled tick, every contact who currently matches the selected criteria is enrolled into the journey.
Custom Event Trigger
Starts a journey for a contact when a custom event is recorded for the contact. Use this trigger to respond to events you've sent to Spreeflo from your app or website, e.g. signed_up, purchased, abandoned_cart. You can also filter on event properties to start the journey only when the event matches specific conditions.
Form Submission Trigger
Starts a journey for a contact when the contact submits a selected form. Pick which published form to listen on. Use this to follow up on form submissions automatically — e.g. send a welcome series after a newsletter signup, or route new leads from a "Contact sales" form. An Only trigger for new contacts option starts the journey only for contacts who are newly added to your audience by the submission, so first-time submitters can be treated differently from returning ones.
Processes
Processes branch the sequence flow based on the conditions you set so that your automation can be highly personalized and responsive to your contacts.
If/Else Process
Split the path based on a if/else condition.
Multi-way Split Process
Split the path into multiple named branches (up to 10), each with its own condition, plus a final Else branch for contacts who do not match any. Branches are evaluated top to bottom, and the contact takes the first matching branch.
Check Email Activity Process
Split the path based on specified email activity for a selected marketing email. You can branch on any combination of Delivered, Opened, Link Clicked, Replied, and their negations (Not Delivered, Not Opened, Link Not Clicked, Not Replied). Each selected activity becomes its own outgoing branch. If none of the selected activities are observed, the sequence flow defaults to the Else branch.
Do note that if you disabled tracking of email opens or email clicks, or did not set up the MX record for receiving email replies, then these actions will not be observed and this process default to the Else branch.
Check Web Push Activity Process
Split the path based on specified web push activity for a selected web push notification. You can branch on any combination of Sent, Delivered, Clicked, Dismissed, and their negations. Each selected activity becomes its own outgoing branch. If none of the selected activities are observed, the sequence flow defaults to the Else branch.
Check Form Activity Process
Split the path based on a contact's activity with a selected form. You can branch on any combination of Submitted, Dismissed, Shown, and their negations (Not Submitted, Not Dismissed, Not Shown). Each selected activity becomes its own outgoing branch. If none of the selected activities apply, the sequence flow defaults to the Else branch.
Random Split Process
Split the path between two paths by a percentage you choose (anywhere from 1% to 99%). Use this to randomly split your contacts into two groups for A/B testing or to set aside a holdout group.
Merge Process
Merge multiple paths into a single path. Use this to combine multiple paths into a single path.
Actions
Actions are the steps to take for the contact, e.g. send email, add tag, etc. See below for the list of actions available.
Send Email Action
Send a marketing email to the contact. You specify the sending email account to send the marketing email. Create the email between two approaches: Use Your Own or Email Builder.
A Send only once toggle (on by default) prevents the same contact from receiving the email more than once even if they pass through this step again. Turn it off if the same contact should be allowed to receive the email on repeated runs.
Send Web Push Action
Send a web push notification to the contact. The contact must have subscribed to web push notifications on your site for this action to deliver. Use this to re-engage contacts with timely updates outside of email, e.g. flash sales, back-in-stock alerts, or new content announcements. This action requires a Pro plan.
Popup Form Action
Show a popup form to the contact while they're browsing your site. Select a published form and the popup embed (Popup, Slider, Popover, or Sidetab) used to display it — reuse an existing popup embed or create a new one. Because popups are delivered live through the Spreeflo SDK, this action only fires while the contact is on a site that has the SDK installed. This action requires a Pro plan.
You can fine-tune when and where it appears: Show on all pages, only specific page URLs, or all pages except certain URLs (wildcards supported); set an expiration so the popup stops being eligible after a number of days or a specific date; and add a frequency cap to show it at most a set number of times per time window.
Send Internal Email Action
Send an internal email to yourself or your team. Use this to be alerted of any actions for you to take yourself, e.g. call a contact to close a sale, etc.
Add Tag Action
Add one or more tags to the contact. A Force tag trigger toggle is available — when on, the Added Tag trigger fires for downstream journeys even if the contact already has the tag. By default this is off, so no trigger event is emitted when the tag was already present.
Remove Tag Action
Remove one or more tags from the contact. A Force tag trigger toggle is available — when on, the Removed Tag trigger fires for downstream journeys even if the contact did not have the tag. By default this is off.
Update Contact Attribute Action
Update a contact attribute. You can update the attribute value or delete the attribute. This includes updating the contact's email subscription status and marketing status.
The available update options depend on the attribute's data type. Text attributes can be overwritten or appended to. Number attributes can be overwritten, incremented, decremented, or multiplied. Boolean attributes are set to true or false directly. Timestamp attributes can be set to the current time or to a specific date.
Update Email Subscription Status Action
Update the email subscription status of the contact. You can update the email subscription status to Subscribed, Unsubscribed, or Non-subscribed.
Time Delay Action
Wait for a specified amount of time before continuing the sequence. The delay can be configured in hours or days.
Wait Condition Action
Wait for a specified condition to be met before continuing the sequence. You also set a timeout duration (in hours or days). The contact proceeds to the next step as soon as either the condition becomes true or the timeout expires — whichever happens first.
Webhook Action
Trigger a webhook when the action is performed. The webhook passes contact information to the webhook URL. Use the webhook to integrate Spreeflo automation with your app for bespoke workflows. This action requires a Pro plan.
You can choose between POST and GET request methods, send all contact attributes or only a specific subset, and optionally authenticate the request using either an API key (header name and value) or a Bearer token.
Need Immediate Help? Contact our support team at support@spreeflo.com or check our other guides for more information.