Our import tool helps you add or update email contacts in Spreeflo. Import from a comma-separated value file (CSV) or enter info directly into the contact table. You can also auto-update multiple existing email contacts at once.
In this guide, you'll learn how to use our import tool to add and update email contacts in Spreeflo.
The file import process has 2 parts. First, prepare your spreadsheet of email contacts outside Spreeflo, then save it as a CSV. Next, use the + Upload CSV button in Audience > Contacts to upload your file and add your email contacts to your Spreeflo audience. If you import your email contacts with subscribed email subscription status, be sure that you have permission to send them email marketing content.
Step 1: Before You Start
Spreeflo integrates with the most popular email providers:
Some European spreadsheet programs use semicolons to separate data fields in CSV or TXT files. If your import file uses semicolons, replace them with commas and try your import again. To learn more, check out our Troubleshooting Contact Imports guide.
In Spreeflo, you can import your email contacts with their email marketing status as subscribed or unsubscribed. You can only import 1 status at a time.
You can also import your email contacts as marketing contacts or non-marketing contacts. You can only import 1 type at a time. Note that your plan's contact count is measured by peak marketing contacts. If your import brings your total marketing contacts above the limit of your subscription plan's contact tier, you'll be subject to additional overage charges.
Step 2: Prepare Your CSV File
To prepare your file for import, follow these steps.
In a spreadsheet program like Microsoft Excel or Google Sheets, open your blank worksheet.
Create and label a column for Email. This field is required to import email contacts.
Create and label additional columns for First Name, Last Name, and any other information you want to import to Spreeflo.
Save the file in a CSV or TXT format. These options can usually be accessed from the File menu in your spreadsheet program, labeled as "Export as .CSV,” “Export as .TXT,” “Download as .CSV,” or “Download as .TXT.”
Nice job! Now that you've prepared your import file, you're ready to import.
Step 3: Upload Your CSV to Spreeflo
To import your file to Spreeflo, follow these steps.
Click Audience, then click Contacts.
If you have more than 1 audience, click the Audience drop-down next to the Contacts label and choose the one you want to work with.
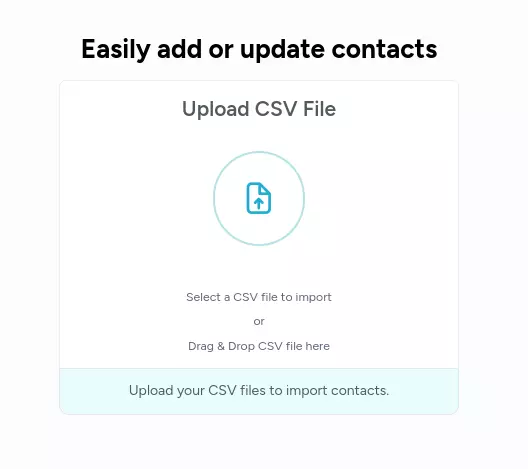
Click the + Upload CSV button.
Drag and drop the CSV file you prepared in the previous step or click the Upload CSV File card to select the file from your computer.
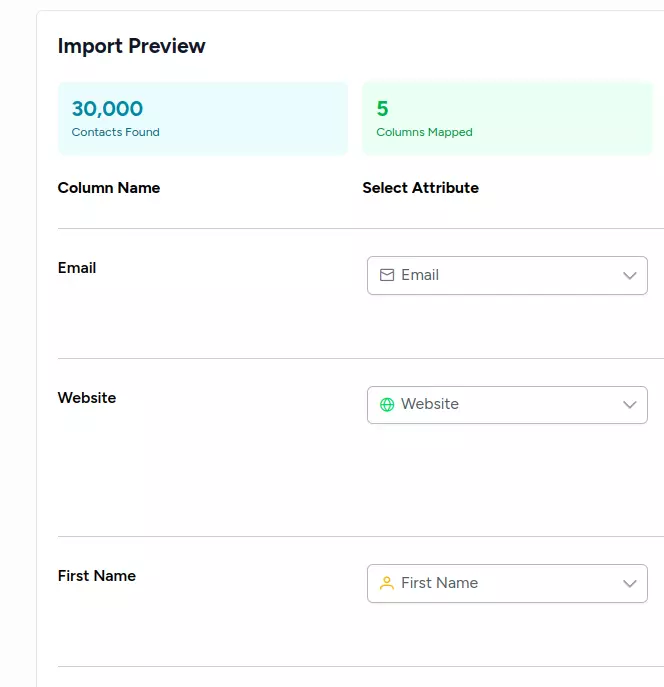
Use the Select Attribute dropdowns to map an existing attribute or create a new attribute to map to your columns.
If your contacts have consented to email marketing, then keep Subscribed selected. Otherwise, select Non-subscribed.
If your contacts are marketing contacts, then keep Yes selected. Otherwise, select No.
Click the IMPORT ALL button to begin importing your contacts.
That's it! After the import is finished.
Tip: When you import email contacts to an existing audience, we won’t include any duplicate, bounced, or unsubscribed addresses that are already stored in the audience.
Tip: Because all audiences in Spreeflo are independent of each other, we can't detect duplicates, bounces, or unsubscribes across multiple audiences. If you have duplicate email contacts in different audiences, you may find it helpful to combine your audiences into a primary audience that uses segments or tags.
Import your contacts manually
To directly create new contacts, follow these steps:
Click Audience, then click Contacts.
If you have more than 1 audience, click the Audience drop-down next to the Contacts label and choose the one you want to work with.
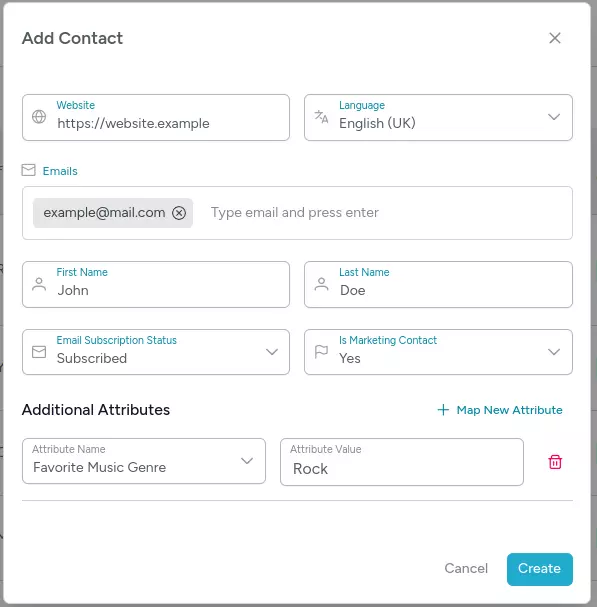
Click the + Add Single Contact button.
Paste your contact information into each attribute input field.
Click + Map Attribute to add existing attributes or create new attributes.
If your contacts have consented to email marketing, then keep Subscribed selected. Otherwise, select Non-subscribed.
If your contacts are marketing contacts, then keep Yes selected. Otherwise, select No.
Click the Create button to create your contact.
Update existing email contacts
You may need to update your email contacts' data if they've been in your audience for a while. Use our upload CSV tool to quickly update multiple contacts at once.
This option replaces existing audience field information with new information from your import file. You'll follow the same process to import new email contacts, but there are a few extra things to consider.
When you prepare your spreadsheet, verify that the column names in your import file match the fields in your Spreeflo audience, and that no columns are left blank. Blank fields overwrite and erase existing email contact data.
You can update subscribed or non-subscribed email contacts with this method.
You can update marketing or non-marketing email contacts with this method.
That's it! When you import, we'll handle the rest by scanning your email contacts and updating their information.