Custom objects
Custom objects bring the records your business runs on into Spreeflo: orders, subscriptions, bookings, accounts, support tickets, whatever you sell or track. You define what a record looks like, add the records, and link them to the contacts they belong to. From then on, every email and web push can quote those records, segments can filter on them, and journeys can start when they change.
This guide covers what custom objects are, when to use them, how to set them up in the app, and how to keep them in sync from your own systems with the Spreeflo API.
Custom objects are part of the Professional plan. The CRM's built-in company and deal records work on Starter too; see Getting started with the CRM.
What are custom objects?
A contact attribute holds one value per contact: a first name, a plan tier, a signup date. That works until a contact has more than one of something. A customer with three orders, a user on two subscriptions, or a teammate on several accounts doesn't fit in a single field. Custom objects are built for that one-to-many shape. Four terms cover the whole model:
| Term | What it is | Example |
|---|---|---|
| Object type | The shape of a kind of record: a key, a name and a list of attributes. Shared across your workspace. | order |
| Attribute | A field on the type, with a data type and a scope. | total, status |
| Object | One record of that type, identified by your own external ID, such as an order number. | Order A-1042 |
| Relationship | The link between an object and a contact. One object can link to many contacts, and one contact to many objects. | Order A-1042 → jane@example.com |
The relationship is what makes an object useful. An object that isn't linked to anyone is stored, but nothing reads it when you send.
Why use custom objects?
Once a contact is related to an object, the object's data works everywhere the contact's own data does:
{{ order.status }} or {{ subscription.renewal_date }} in any email or web push and it fills in from the recipient's related record. Nothing needs declaring in the template. shipped can send the shipping email on its own. Some object types worth considering, depending on your business:
order, cart, returnsubscription, workspace, account (with each user's role on it)booking, appointment, course_enrollmentticket, support_caseAttributes, data types and scope
Every attribute has a data type, which decides how its values are stored and which operators the segment builder offers for it:
| Data type | Holds | Example value |
|---|---|---|
Text (TEXT) | Any text up to 255 characters | "shipped" |
Number (NUMBER) | Integers and decimals | 129.99 |
Boolean (BOOLEAN) | True or false | true |
Timestamp (TIMESTAMP) | A date and time, stored in UTC | "2026-11-02T09:30:00Z" |
Every attribute also has a scope, which decides where its value lives:
total, a subscription's plan. role on an account, a guest's seat on a booking. Two contacts related to the same account can each have a different role. Both scopes share the object type's namespace in templates, so {{ account.role }} works whichever scope role has. Pick the scope carefully: an attribute's data type and scope can't be changed after it's created. Its display name can.
Create an object type
Go to Audience > Objects and click New object type. Fill in:
order. Lowercase letters, numbers and underscores, starting with a letter. It can't be changed later. You don't have to declare every attribute up front. When the API sends a value for an attribute key the type doesn't have yet, Spreeflo creates the attribute for you (see Rules and limits). You can add attributes later with Edit type; existing attributes are never removed by an edit.
Remove type deletes the type, every object of that type and every relationship those objects hold. It can't be undone, and any template that references
{{ order.* }}will render those variables empty.
Add objects
Click an object type to open it. The page lists its attributes and the objects in the audience you have selected. To add a record, click New object, enter its External ID (your own identifier, such as the order number, which can't be changed later) and fill in its object-scoped attribute values.
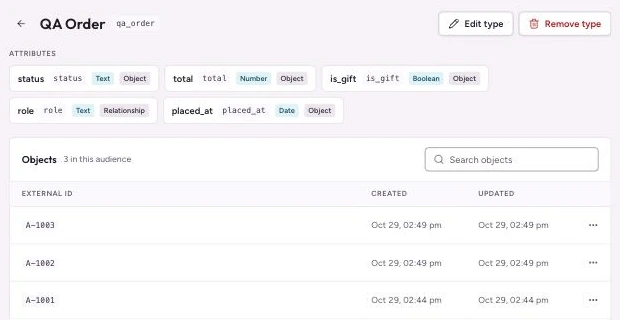
Use the search box to find objects by external ID or by attribute value. From an object's ⋯ menu you can Edit values, open Related contacts, or Remove it. Edit values opens with the object's current values; emptying a field keeps its stored value.
Adding records by hand is useful for testing and one-offs. For real volumes, sync them from your systems with the API.
Relate objects to contacts
Open the object's ⋯ menu and choose Related contacts. Under Relate a contact, enter the contact's email, fill in any relationship-scoped attributes, and click Relate contact. The contact must already exist in the audience; relating doesn't create contacts.
The same window lists everyone already related to the object, with the values on each link. Click Unrelate to remove a link. Unrelating removes the link and its relationship attributes only: the contact and the object both stay. Relating a contact who is already linked updates the values on their link.
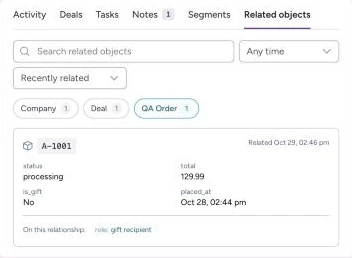
To see it from the contact's side, open their profile in Audience > Contacts and go to the Related objects tab. It lists every object they're linked to, filterable by type, with both the object's values and the values on their link. Each link and unlink also appears on the contact's Activity timeline, with who made it.
Personalise emails and web push
An object's attributes are reachable in any email or web push template under the object type's key. A type keyed order with an attribute keyed status gives {{ order.status }}; a type keyed support_ticket gives {{ support_ticket.subject }}. In the editors, object attributes appear in the variable picker next to contact attributes.
Hi {{ contact.first_name | default: "there" }},

Your order {{ order.order_number }} is {{ order.status }}.
Total: {{ order.total }} {{ order.currency }}

{% if order.is_gift %}We've left the receipt out of the box.{% endif %}
A contact can be related to several objects of the same type, but a message reads one. If the journey was started by an object trigger, the message uses the object that started it, as long as that object still exists. Otherwise it uses the contact's most recently updated link of that type. Values are read when the message is sent, so an email after a wait step shows the object as it is then.
This holds after the contact is unrelated from the object, so a journey started by Unrelated from object can still quote the order it's about. Its object-scoped values render as usual, but its relationship-scoped values, such as the contact's role, were removed with the link and render empty.
If the contact has no object of that type, or the attribute has no value, the variable renders empty. Give it a fallback with the default filter, and see Liquid syntax for formatting numbers, money and dates.
To check object variables before sending, pick a contact related to an object of that type in the email editor's preview: the preview renders that contact's objects.
Segment by objects
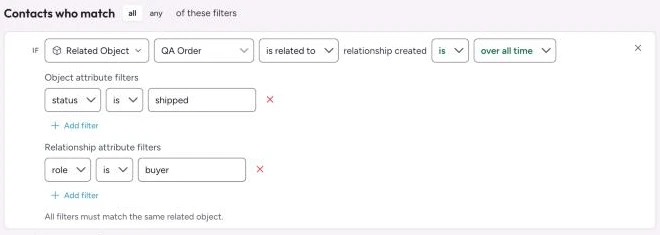
In the segment builder, click Select a filter and choose Custom objects. Pick the object type, then an operator, and optionally limit it to links created within a time window:
Narrow the rule with filters on object attributes and relationship attributes, for example status is refunded and total is greater than 100. All the filters in a rule must match the same related object, so "a refunded order over 100" won't match a contact who has one refunded order of 20 and another unrefunded order of 150. Segments update as objects and relationships change. For more on building segments, see Getting started with segments.
Trigger journeys from objects
Three triggers in the journey builder start a journey from object activity:
Emails and web pushes in a journey started by any of these triggers read the object that triggered it, so a shipping email quotes the order that shipped, not the contact's latest one. See Campaign and journey automation for building the rest of the journey.
Manage objects with the API
Most teams keep objects in sync from their own backend: create or update the order when it's placed, relate it to the buyer, update it as it ships. The Objects API does this with three idempotent PUT calls, all keyed by identifiers you already have, so you never need to store a Spreeflo ID.
Before you start, you need:
Authorization: Bearer <YOUR_API_KEY>. See Use Spreeflo API. audienceId; list your audiences with GET https://api.spreeflo.com/1.0/lists to find it. All endpoints live under https://api.spreeflo.com/1.0/objects. The examples below use an order type; the full request and response schemas are in the API Reference under Objects.
Step 1: Create the object type
PUT /objects/types/{typeKey} creates the type, or updates the one already at that key. Do this once, or on every deploy: the call is safe to repeat. The attribute list is additive, so attributes you leave out are kept.
curl -X PUT https://api.spreeflo.com/1.0/objects/types/order \
  --header 'Authorization: Bearer <YOUR_API_KEY>' \
  --header 'Content-Type: application/json' \
  --data '{
    "audienceId": "<AUDIENCE_ID>",
    "name": "Order",
    "description": "Orders from our store",
    "attributes": [
      { "key": "order_number", "name": "Order number", "data_type": "TEXT", "scope": "OBJECT" },
      { "key": "status", "name": "Status", "data_type": "TEXT", "scope": "OBJECT" },
      { "key": "total", "name": "Total", "data_type": "NUMBER", "scope": "OBJECT" },
      { "key": "currency", "name": "Currency", "data_type": "TEXT", "scope": "OBJECT" },
      { "key": "is_gift", "name": "Gift", "data_type": "BOOLEAN", "scope": "OBJECT" },
      { "key": "placed_at", "name": "Placed at", "data_type": "TIMESTAMP", "scope": "OBJECT" },
      { "key": "role", "name": "Role", "data_type": "TEXT", "scope": "RELATIONSHIP" }
    ]
  }'
Step 2: Create or update an object
PUT /objects/{typeKey}/{externalId} creates the object or updates the one at that external ID. attributes is a flat map of object-scoped values; keys you don't send keep their stored value. Call it again whenever the record changes.
curl -X PUT https://api.spreeflo.com/1.0/objects/order/A-1042 \
  --header 'Authorization: Bearer <YOUR_API_KEY>' \
  --header 'Content-Type: application/json' \
  --data '{
    "audienceId": "<AUDIENCE_ID>",
    "attributes": {
      "order_number": "A-1042",
      "status": "processing",
      "total": 129.99,
      "currency": "USD",
      "is_gift": false,
      "placed_at": "2026-11-02T09:30:00Z"
    }
  }'
The response carries the object's stored values:
{
  "id": "5b0e4c1e-8a7f-4d2b-9a43-2f1f6d1c7e90",
  "external_id": "A-1042",
  "type_key": "order",
  "attributes": {
    "order_number": "A-1042",
    "status": "processing",
    "total": 129.99,
    "currency": "USD",
    "is_gift": false,
    "placed_at": "2026-11-02T09:30:00.000Z"
  },
  "createdAt": "2026-11-02T09:30:01.214Z",
  "updatedAt": "2026-11-02T09:30:01.214Z"
}
Step 3: Relate a contact
PUT /objects/{typeKey}/{externalId}/relationships links a contact, identified by email, to the object. If they're already linked, it updates the link's relationship-scoped attributes instead. The optional attributes here go on the link, not the object.
curl -X PUT https://api.spreeflo.com/1.0/objects/order/A-1042/relationships \
  --header 'Authorization: Bearer <YOUR_API_KEY>' \
  --header 'Content-Type: application/json' \
  --data '{
    "audienceId": "<AUDIENCE_ID>",
    "email": "jane@example.com",
    "attributes": { "role": "buyer" }
  }'
The contact must already exist in the audience, or the call fails with Contact not found. If your buyer might be new, upsert them first with PUT /lists/{audienceId}/contacts:
curl -X PUT https://api.spreeflo.com/1.0/lists/<AUDIENCE_ID>/contacts \
  --header 'Authorization: Bearer <YOUR_API_KEY>' \
  --header 'Content-Type: application/json' \
  --data '{ "email": "jane@example.com", "first_name": "Jane" }'
Relating is safe to repeat. Related to object fires only when the link is new; relating a contact who is already linked updates the link's attributes and any segments that filter on them, and starts no journey. It does make that link the contact's most recently updated one of the type, which is the one their messages read when no object trigger picks another.
Unrelate a contact
DELETE /objects/{typeKey}/{externalId}/relationships/{md5HashedEmail} removes a link. Like the rest of the API, the path identifies the contact by the MD5 hash of their lowercased email; the raw address goes in the email query parameter as well, and the two must match.
# md5 of the lowercased email: echo -n 'jane@example.com' | md5
curl -X DELETE "https://api.spreeflo.com/1.0/objects/order/A-1042/relationships/<MD5_HASHED_EMAIL>?audienceId=<AUDIENCE_ID>&email=jane@example.com" \
  --header 'Authorization: Bearer <YOUR_API_KEY>'
Example: sync an order from your backend
Put together, a checkout handler upserts the buyer, upserts the order and relates them. Later status changes only need step 2, which fires Object updated for the buyer.
const API = 'https://api.spreeflo.com/1.0';
const headers = {
  Authorization: `Bearer ${process.env.SPREEFLO_API_KEY}`,
  'Content-Type': 'application/json',
};
const audienceId = process.env.SPREEFLO_AUDIENCE_ID;

const put = async (path, body) => {
  const response = await fetch(`${API}${path}`, { method: 'PUT', headers, body: JSON.stringify({ audienceId, ...body }) });
  if (!response.ok) throw new Error(`Spreeflo ${path}: ${response.status} ${await response.text()}`);
  return response.json();
};

export async function syncOrder(order) {
  // 1. Make sure the buyer exists in the audience
  await put(`/lists/${audienceId}/contacts`, { email: order.email, first_name: order.firstName });

  // 2. Create or update the order
  await put(`/objects/order/${encodeURIComponent(order.id)}`, {
    attributes: {
      order_number: order.id,
      status: order.status,
      total: order.total,
      currency: order.currency,
      placed_at: order.placedAt,
    },
  });

  // 3. Link it to the buyer (safe to repeat: Related to object fires on the first link only)
  await put(`/objects/order/${encodeURIComponent(order.id)}/relationships`, { email: order.email, attributes: { role: 'buyer' } });
}
All Objects endpoints
| Method and path | Does |
|---|---|
GET /objects/types | Lists object types (paginated) |
PUT /objects/types/{typeKey} | Creates or updates an object type |
GET /objects/types/{typeKey} | Retrieves a type with its attributes |
DELETE /objects/types/{typeKey} | Deletes a type, its objects and their relationships |
GET /objects/{typeKey} | Lists a type's objects (external IDs only, paginated) |
PUT /objects/{typeKey}/{externalId} | Creates or updates an object |
GET /objects/{typeKey}/{externalId} | Retrieves an object with its attribute values |
DELETE /objects/{typeKey}/{externalId} | Deletes an object and its relationships; contacts are untouched |
PUT /objects/{typeKey}/{externalId}/relationships | Relates a contact, or updates the link's attributes |
GET /objects/{typeKey}/{externalId}/relationships | Lists an object's relationships (paginated) |
DELETE /objects/{typeKey}/{externalId}/relationships/{md5HashedEmail} | Unrelates a contact |
Every endpoint needs audienceId: in the body for PUT, as a query parameter otherwise. List endpoints take page (from 0) and pageSize (1 to 50, default 20).
Rules and limits
contact, spree, ai, var or owner, can't start with spree_, and company, deal and event are reserved for the CRM. true/false become Boolean, date strings become Timestamp, everything else Text. "129.99" is inferred as Text, and the type is then fixed. Declare attributes in step 1, or send 129.99 unquoted. company and deal types accept attributes of your own, but their name, description and built-in attributes can't be changed. Need Immediate Help? Contact our support team at support@spreeflo.com or check our other guides for more information.